How To Dig A Threadless - Part C
by Ray Klingensmith
Reprinted from "INSULATORS - Crown Jewels of the Wire", August 1983, page 21
How to Dig
Everyone has their own way of doing
things, and I will explain some of the methods I use. Let's assume you have
found the exact location of an old pole. Do a little hunting around the most
promising spots. If I don't find anything within a few minutes, and I plan to
spend a couple hours digging there, I usually walk out away from the most
likely spot the insulator will be. (See drawing.)
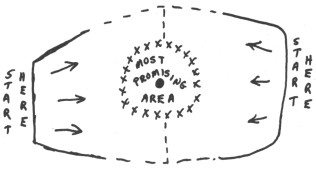
Then I dig toward the most
likely spot. If I don't find anything on that swath, I do the same on the other
side, starting at the least likely spot and working toward the center. A lot of
times the glass was thrown from the pole several feet. Or consider an eighteen
or twenty foot pole fell over with your jewel on it. It could be anywhere in the
immediate area. The reason I don't start at the most promising spot first is
quite simple. If you look in the most promising spot first, and don't find
anything, the further out you dig, the more discouraged you become. By the time
you get out anywhere near far enough to where it could be, you become quite
discouraged. If you start out there when you are fresh and full of energy, there
is always the most promising spot to dig towards. Instead of losing interest as
you dig, you will gain interest. Digging this way depends a lot on where you are
digging.
I have found spikes or ties, and within a minute or two, with just the
minimal scratching around, have come up with the glass. If working a line where
that happens fairly often, then you might want to start at the most likely spot
first. But don't stop too soon if you don't find something right away. Once
again, all lines will be different. There are so many things to be taken into
consideration before you can figure out the "system". On a line that
was abandoned you will have to consider the possibility that the poles fell over
with insulators and wire still attached. Perhaps in later years someone gathered
the wire. If so, most likely the ties, spikes and glass will be fairly close to
each other. If the line was rebuilt and kept in use, consider ties and glass
being thrown from the pole top. It takes a lot of time and experience to figure
out the most likely place your treasure will be. That's why it's important to do
your homework first and try to find out what happened to the line in later
years. Once you find "remains" at one pole, imagine in your mind where
the next pole would be. In most cases the early lines had twenty-five to thirty
poles to the mile. Get used to pacing off the required distance. If you
familiarize yourself with the "spans" or spacing, you will save
yourself a lot of time. Step off the distance and look for clues in the
immediate area. Don't become entirely dependent on this method. It will follow a
pattern most of the time, but factors such as rebuilding the line for one reason
or another can throw you way off. Perhaps you will find a broken threadless at
the site of an original pole. Maybe three or four years after original
construction the line was rebuilt and the pole location moved fifty feet one way
or the other! Maybe your whole one is in a place you consider unlikely -- only a
few feet from the broken one. Don't worry too much about things like that,
because it only happens on rare occasions. I mention it only so that you don't
overlook one of the possibilities. The best rule is to first check the area
considering the insulators are to be found in the usual pattern. Then recheck it
everywhere for possible exceptions.
Pay very close attention to the direction of
the road, trail, railroad or other path your line is following. If the course
changes sharply for a hill, obstacle, river crossing, etc., keep in mind the
line may have kept a straighter course and cut a few corners off. Also, in most
cases line builders didn't cross or run the line overhead of whatever
transportation route they were following. There was too much chance for
accidents of running into the wire from fallen poles. So the less crossing from
one side to the other, the better. Turns on curves were very wide at times to
keep the wire from going overhead. Keep these things in mind as you try to
locate the pole locations. You may also find the pole spacing will vary
depending on the terrain.
Steep hills or knolls must be taken into consideration
when figuring the spacing. On cross country lines also keep in mind the lines
usually followed some type of water route, or at least in the same general
direction as a stream. The "flow of land" usually runs in the same
direction as a water route, and drastic elevation changes could be avoided by
line builders using that method. Also make note of ridges or other land features
that a line may have followed. Try to visualize yourself building the line,
trying to maintain the shortest, straightest route possible, but at the same
time avoiding any drastic elevation changes or serious obstacles. It amazes me
how some of these lines were built over one hundred years ago in such a short
time, and the absolute best possible route was used, when so little was known
about the area. Sometimes I wonder if we today could do as well with all the
modern equipment we have!
Aside from all the maps, tools and other things I've
mentioned, there are a couple very important things to remember. Know who owns
the property you are looking on, and if privately owned, get permission to hunt.
Most landowners are very helpful if you approach them in the right way. If the
land is owned by local, regional, or the national government, find out what
restrictions there are concerning use of metal detectors, removal of historical
objects, or any type of excavation. If your huntin' involves traveling across
international borders, find out what customs regulations are in effect, as well
as rules on removal of items of historical value. Also keep in mind the source
of your information, whether it be a book, company report, map, or whatever,
usually follows one general rule -- the older the source, the more accurate it is.
It's amazing the amount of false information that has been printed in the last
fifty years. Try to get some old documents in your researching.
Another very,
very important part of your hunting is the cataloging of everything old that you
find. Carry small plastic bags to put your fragments and other relics in after
finding them. Jot down on a piece of paper the location you find it. I usually
number each item and enter a very descriptive account of exactly where it was
found. Carry some sort of plastic marker tape with you. If you find an
insulator, tie the tape to the nearest rock, tree, or "whatever". You
might want to drive some sort of stake in a desert or similar region where trees
are scarce. The orange, yellow or blue "surveyors marker tape" is
best. It is usually about one inch wide. Leave enough of it so you can easily
see it on any return trips in the future. You might want to carry several
different colors. An insulator might be marked with yellow. An old tie wire,
with orange. Square spikes, with blue. Probable location of a pole site,
considering usual spacing could be marked with red. That way each time you
return you will know exactly where you found something and where you didn't.
Pole spacing will be much easier to determine by doing this. Don't rely on your
memory, because it just won't be as accurate two or three years from now.
Maybe
you will want to keep your huntin' grounds secretive for a time, but
realistically, eventually you will want to share it with others. Until you tell
them your color coding of the tape, they won't know what they stand for, anyway.
That way you can refer them to points along the route, and they will know where
you are talking about. And, likewise, maybe they will tell you where they have
and have not found items along the way. What's the use of you or them spending a
day digging at a pole if someone else has already found the insulator there?
Let's get down to it here -- we are in this as a hobby. If we work together, we
will all have a lot more fun and end up with a lot more nice relics to share in
the hobby. If you want to dig on a line and know someone who has dug on it, give
them some respect. After a person does a lot of research and looking in a given
area, they normally feel it's "their territory". Tell, them your
interests and explain to them you respect their personal involvement. You aren't
there to "cash in" on all their research and work. You are there to
have some fun and would like to find some old relics. If they want to share part
of their knowledge, ask them to be totally honest with you. Most people will not
mislead you or send you in the wrong direction. If I know of a place I want to
go back to and someone asks me about it, just simply tell them it's an area I'd
like to save for a future trip of my own.
There are some sections of one line I
dig on that is real promising, and yet I don't go there myself. Why not? Well, I
get collectors who visit every once in awhile, and I'd just as soon save it for
the times I take them out. Maybe they will find something that way. And, on the
other hand, there are places I've found a fair quantity of insulators, that I've
literally turned upside down, and spent an awful lot of time at. Chances of me
or anyone else finding anything there are slim, but yet I'd just as soon not
tell everyone where it's at just because it has a special attraction to me. So,
if you want to keep a new find under cover until you have had enough time to do
a fair amount of looking, by all means don't tell the world about it. But, after
finding a few things yourself, don't hesitate to let some friends know about it,
and, hopefully, they will do the same for you someday.
Other Pointers and
Suggestions
Some other things to take into consideration are all the
"elements" of time that are working against or for you. Pay close
attention for evidence of severe fires through an area. (It can explain why all
the glass you find is broken.) Logging in the area many years ago may have
disturbed the soil to some degree. Floods can leave several feet of silt on your
jewels, or may have washed them away. Blowing sand in desert or windy areas can
change the surface. Extensive use of rock, dirt and other types of fill in later
years on the downhill side of a railroad or road may have been used to eliminate
erosion. Insulators normally found at a depth of three or four inches, can be
under several feet of fill at these locations. Keep all these things in mind.
Don't let them discourage you, but put your knowledge to use and check the more
promising locations first -- that is, those that are the least likely to have been
affected by these or other elements.
You might want to take a good camera along
(Put it in a sealed plastic bag in case it rains.) to take a photo of the
insulator you find before you pull it from its resting place. I've got some very
nice photos of threadless three-fourths buried in the dirt, before I even
touched them. And after careful removal, it's neat to get a photo of the
insulator sitting next to the impression of its outline left in the soil where
it has been for several decades.
When doing your research, keep in mind the
possibility of any branch lines extending from the main line. These may have
gone to mines, forts, hospitals, government buildings, oil tanks, or any number
of other places. Use your imagination.
Many large cities used threadless on
early fire alarm or police signal lines. It might pay to check some of the older
buildings in town. Rooftops, bridges, or sides of the buildings are some places
to check. If you can locate an old fire house, there might be something inside,
too.
Besides looking on a line, there is also a large number of threadless to be
dug in town or farm dumps in the vicinity of the route of early telegraph lines.
Probably one of the more promising, and yet almost untouched areas of hunting,
is diving. If I knew how to dive, I guarantee you I'd have some "underwater
threadless" on my shelf by now. There are a countless number of places to
look using this method.
After you've gone out and found a part of an insulator,
by all means don't leave the place where you've found it just because it's
broken. Ninety-five per cent of the time the rest of the pieces are still in the
immediate area. (Ask Cecil. He found at least ninety-five pieces to his first
Chester threadless.) Seriously, though, especially on the rarer or colored and
more historical items, take your time and very carefully check for the rest of
the glass.
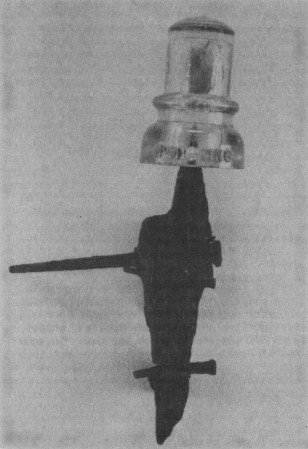
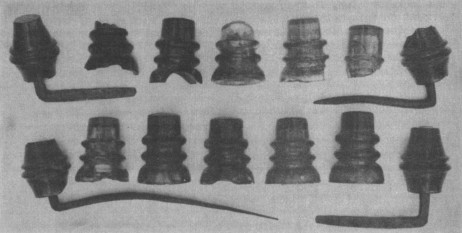
If you are fortunate enough to find an insulator with the original
tie wire attached, or better yet, on a section of the original line wire, don't
remove it! As time goes on you will realize the historical importance
of having
all that original hardware. (See photos.) In looking at the photos of the
Chesters, don't you have to agree they make for great historical display items?
Much more so than if the wire were discarded and the insulators kept for just
monetary value? It's sad to think these are some of the few that have been kept
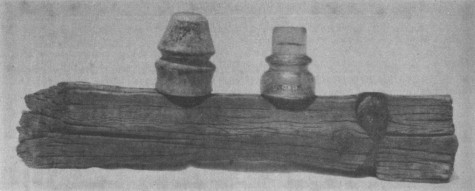
that way, in comparison to those that have not. Also try to salvage any remains
of side pins, crossarms, etc., if possible, Some are pretty crumbly, but keep
them with the insulator for the history. Tie wires and square nails used to
fasten the bracket to the pole are also very attractive if mounted on a piece of
rustic wood with the insulator. (If you don't find the insulator, leave the
nails and ties for the person who does go through the work of locating it,
rather than carting off all the hardware yourself.)
The time of year it is best
to look will vary a great deal on the location. Early spring will usually be the
best in most areas, as the foliage isn't on yet, and you can see the ground
surface easier. However, in the east, when looking on heavily wooded hillsides,
it might be best to check the ground in late summer just before the leaves fall,
as that is the time the leaves will be in the least abundance, as they will have
decayed from the previous autumn. Other areas might have very hard soil except
for a rainy season at one part of the year. Or perhaps swamps might only be dry
in mid summer. Learn the weather, soil, and other conditions of the area. Don't
let any of the obstacles stop you, though. I've dug through eight inches of snow
in New York State in December on the NY&ERR. On one trip, two days before
Christmas, I found a pretty green 736. Nice color to find at holiday time! If
you plan a dig in the near future and need some extra pointers or info, please
feel free to contact me. I'll do as much as I can for you. And, by all means, if
you go out and find something, let me hear from you! Happy Huntin'.
By the way,
all the insulators in the photos used in this article are ones I've found, most
of the whole ones being in the past two years. So you see, they can be found!
McMicking found with old "cathedral type" side pin.
This particular item was probably placed in use in the late 1870's or early
'80's. |
S. McKee, Mulford & Biddle/UPRR and part of an early crossarm found in
Wyoming. The section of crossarm, being a "two pin type", plus taking
into consideration the location it came from, leaves one with the strong
impression it could have been one of the originals from the 1868-69 UPRR
telegraph line. |
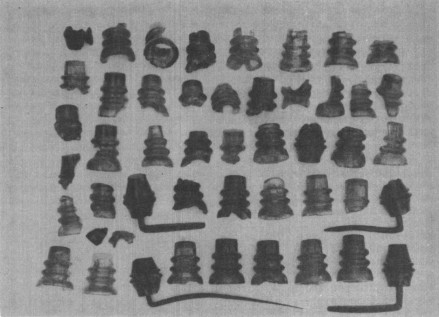
This group consists of about 1/3 of the total number of pieces
of threadless found along the NY&ERR over the past seven years. Included in
the group are pieces of unembossed CD 736 in various shades of green and aqua,
amber 736.4, "big blue", ERW, 701 eggs, NY&ERR's in sapphire blue,
puce, light green and varying shades of aqua and others. |
Some of the larger
pieces and 'goodies' from the NY&ERR. Third from right, bottom row, is a
mint condition bubbly aqua NY&ERR, which was the first whole threadless
found, after 92 broken ones. Also included is a mint green 736 VNM condition,
and several other nice shelf pieces. |
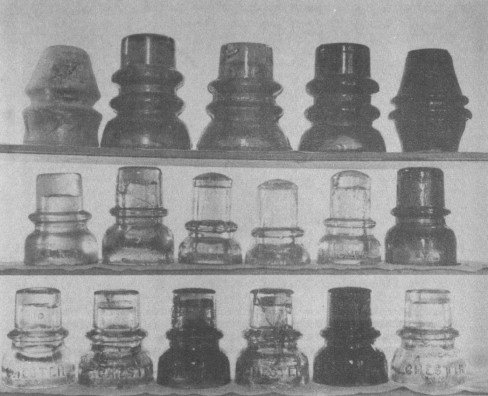
Some of the jewels found in the past four
years.
Top row, left to right: Aqua S. McKee & Co., mint, green 736; bubbly
aqua NY&ERR; emerald green 736; dark green 701 egg.
Second row: Aqua
UPRR/Mulford & Biddle; aqua Tillotson/16 Broadway NY; aqua McMicking with
amber streaks; short green aqua McMicking; tall blue aqua McMicking; green
Tillotson/16 Broadway
Third Row: Aqua Chester; light green-yellow amber mixture
Chester; swirled medium amber Chester; aqua-olive mixture Chester; dark yellow
amber Chester; aqua with olive streak Chester.
|
|

)
)
)
)
)
)